Diesel Fuel Filter Water Trap

The purpose of a fuel filter is to make sure that only clean fuel enters into the engine to be burned. Both petrol and diesel engines use fuel filters, however, in a diesel engine it is critical that the fuel is filtered for contaminants before entering the engine and for water to be filtered out to avoid any possible damage to the engine. This is not the same in the case of petrol engines.

This is why a fuel filter with a water trap is commonly used in private and commercial diesel engines. Typically the filtering of contaminants and water is done within the same fuel filter unit. The filter may have a bowl shaped reservoir at the bottom where the water will gather, as water is heavier than diesel.

The water then has to be removed, and this is normally achieved by using a valve at the bottom of the reservoir so the water can be drained away leaving just clean diesel fuel.

In many modern cars and commercial vehicles, sensors and electronic valves are used which drain the water automatically once it has reached a certain level in the reservoir of the filter.

Water contamination can be caused by a variety of things such as condensation which gathers inside the fuel tank due to humidity or temperature changes. As fuel is normally fed form the bottom of the fuel tank, and water is heavier than diesel, it means that the water will be sucked up first when you start your engine in the morning.

Typical sign of water contamination in fuel are when your engine runs rough, or idles with an uneven rhythm or loses power. This could be caused by either solid or water contamination but you should drain any accumulated water from the fuel filter water trap first or completely replace the fuel filter.
Buying Parts for Ford Transit Connect – Tdci or Tddi?

When buying parts for the Ford Transit Connect it is essential that you know what engine you have.

Here’s the things to check:

  1. Is yours before or after 2006?
  2. What is the Brake Horse Power (bhp) of your engine

Before 2006:

75bhp – TD-DI

90bhp – TD-CI

After 2006:

75bhp & 90bhp – TD-CI

Other Ways to Check

Normally there is either a “CI” or “DI” stamped on the engine. Or if there is wiring to the injectors it’s a CI.


Hyundai Santa Fe 2.2 Crdi Oil Filter Discrepancy

Santa Fe’s 2.2 Diesels from 2005 to 2009 (End) all use Spin On Oil Filters.

There is a catalogue discrepancy and many parts suppliers are listing a cartridge/paper element type oil filter for this model. From our experience, this is wrong and models upto 2010 all they all take the screw-on filter.

We sell an ADL Blueprint Part Number ADG02133 which is equivalent to Original Part Number 26310-27420.

Click here to buy the correct oil filter for Hyundai Santa Fe 2.2 Diesel (2005-2009)


How to change Vauxhall Corsa C Handbrake Cables

The smaller engine Corsa C’s all have brake drums on the back. The handbrake cable assembly on these is made up of 3 main cable sections and 2 small pieces which fit to the brake shoes. The sections are listed below:

  1. A short 33cm Front Section which connects to the handbrake lever
  2. A 105cm Middle Section goes from the handbrake lever towards the rear left (nearside) brake drum
  3. A shorter 83cm Middle Section, runs towards the right (offside) brake drum.
  4. Two short cable sections (only 22cm long) connect to the two main cables to each wheel’s brake shoes.

Both the middle cables are connected together by the equaliser, located above the rear axle cross member.  Either part of the cable assembly can be replaced independently of the others. The common replacement is the longest 105cm cable which runs from the front towards the left wheel.

The Long Middle 105cm Brake Cable – Replacement procedure

  • First, slacken the nuts which hold the exhaust shield in place underneath the car and you will then have access to the bottom part of the handbrake lever.
  • From inside the car, remove the handbrake cable adjuster nut.
  • Take off the left-hand rear brake drum
  • Carefully extract the upper and lower return springs, next remove the spring cup, spring and retainer pin and lastly remove the rear brake shoe. You can leave the front shoe and adjuster strut mechanism as they are, in position.
  • Release the handbrake cable from its retaining clip, which is located on the lower pivot point of the brake shoe, after removing the retaining clip you can withdraw the cable from the rear of the backplate.
  • Work along the length of the cable, releasing it from its retaining clips and associated guides. Remember to note how and where it was fixed (for when you are reinstalling the new cable).
  • Disconnect the front end of the cable from the rubber grommet which is around the equaliser link and remove the cable from underneath the car.
  • When you refit the new cable, connect the front end of the cable to the handbrake lever, and then hook the cable through the equaliser link.
  • Make sure the cable is securely held in position by the rubber grommet.

Facebook is hard to use

I’m not from an IT background, but over the years I’ve often needed to learn new softwares and websites for business. e.g. ebay, shopping carts, wordpress, linkedin etc and I like to think I’m quite fast as picking up these things. And then there’s Facebook. I used Facebook a few years back as I had a personal account and at that time I remember it being simple.

I’ve now had to go back to Facebook to promote my business and I am literally pulling my hair out – I’m finding Facebook’s site functionality and navigation to be very frustrating. Doing simple things like adding photos, which I would normally figure out in seconds, take me ages to figure out. Editting my business page and adding additional functionality like apps and feeds and proving very difficult.

My message to Mark Zuckerberg – make your site easier because right now it’s feels as ergonomic as gloves on feet.

Anyway, that’s my moan for the day. If you stumble across the Doctor Car Parts Facebook Page, bear with me while I struggle with it.

How to Fit a Pollen Cabin Filter to 3 Series E90 E91 E92 E93

Here is the simple procedure to follow in order to replace the Bmw 3-Series E90 Pollen filter (also called Cabin Filter) on the BMW E90 series (2005 onward).

All Pollen Filters for 3 Series 2005 onwards model (Model Code E90,E91,E92,E93) are the same. It is advisable to replace the pollen filter with one which is ‘carbon coated’ as provide better filtration.

First, simply open the bonnet and locate the air filter housing, which is found towards the back of the engine compartment, just below and in front of the windscreen.

It is a long rectangular shaped black plastic housing approximately 832mm x 20mm x 132mm. There are six T20 torque screws that fasten the top of the plastic housing to its mounting.

You will need to loosen these screws first, with a suitable torque driver, in order to remove the housing from the mounting and gain access to replace the cabin air filter.

Two  of the T20 torque screws are found on the front edge of the casing, one at either rear corner of the housing and two more on the back edge of the housing – after removing all six screws you can pull the housing up and out from its resting position and remove it from the vehicle.

You will now see the light coloured filter inside the casing and this can be released by undoing the three latches located along the edge of the casing.

Inspect the casing for any sign of damage such as cracks or splits and clean the inside of the casing if necessary. Unpack and insert the new filter – there are three hooks on the lower edge to locate the new cabin air filter and then snap the three latches into position to lock it into place inside the housing.

Once the new cabin air filter is in place you can align the casing with the mounting and after making sure that it is positioned well – lock it in place with the six T20 torque screws to secure it to the mounting again.

Mini Cooper / One Model Codes: R-what? Facelift?

While trying to buy mini parts you might come across an R-code e.g. R50, R52, R53, R56 or R57.

Today I had a customer ring up for an alternator belt and belt tensioner. His car was a 2004 cooper, but in the catalogue there’s two 1.6 cooper models running between 2001 and 2009.

So here’s some important facts:

  1. Mark1 (1st generation) has a Facelift in 2004 – the position of the interior clock is the key. if it’s positioned in the centre, it’s a facelift. if it’s up near the interior mirror/sun visor, then your’s is pre-facelift.
  2. R50 = 1st generation, Cooper, One and One D
  3. R52 = 1st generation Cooper S
  4. R53 = 1st generation Cabriolet (all models which are cabriolet)
  5. R56 = 2nd generation, all models which came in 2006/2007

Doctor’s Tip

Find more info on your BMW or Mini car by entering the last 7 digits of your vin number here


Citroen C3 Hdi Diesels – Know Your Engine Code!

Trying to Buy Citroen C3 Car Parts for a HDI Diesel? Be careful because there are a few different types of 1.4 and 1.6 engines. It is advisable to know your engine code as this will help when searching / buying parts.

1.4 hdi 2002 to 2009

  1. 16valve DV4TED (92 bhp)
  2. 8valve DV4TD engine (68 bhp).

1.4 hdi 2009 onwards

  1. DV4TD engine
  2. DV4C engine.

1.6 hdi 2005 to 2009

  1. DV6TED4

1.6 hdi 2009 onwards

  1. 110bhp DV6CTED E5
  2. 90bhp DV6ATED E4
  3. 90bhp  DVDTED E5 (FAP)

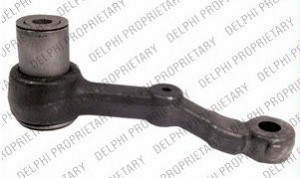
Bmw 5 Series E34 Steering Idler Arm or Pitman Arm

Today a customer asked for an steering idler arm for an old e34. they are available from us. delphi part number is tl530 / bmw 32211136450

It fits like to one side of the car only.

PITMAN ARMturns out this part has quite a few names:

steering idler arm, pitman arm, steering lever…so when you’re searching you might want to try all of them for the best prices!